-
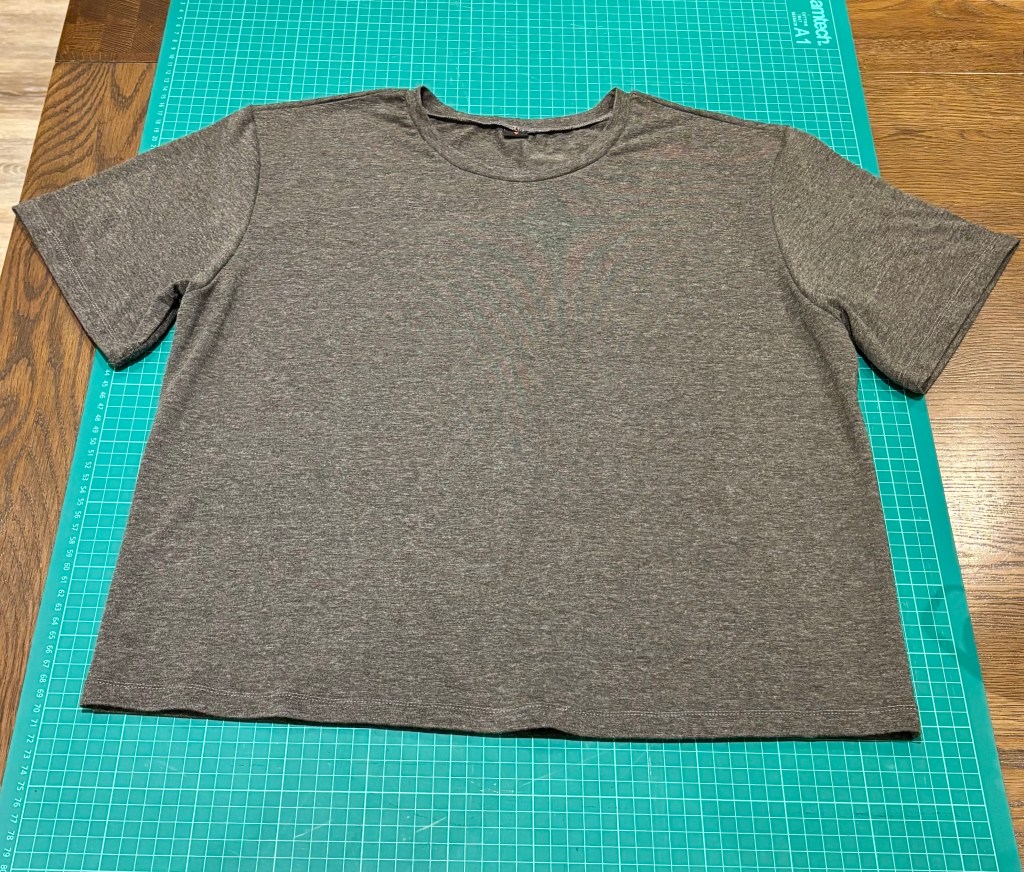
Creating a Staple T-Shirt: My True Bias Jesse Tee
Last year I bought a ready-to-wear striped t-shirt from H&M which was cropped enough but not too cropped, and I had lots of wear out of it. When I saw the True Bias Jesse Tee pattern it reminded me of this t-shirt and one of my sewing goals this year is to find some staple t-shirt patterns, so here we are!
Fabric
I rolled out my grey jersey fabric that I have a tonne of from a sale at Dunelm. I like to use it to make wearable toiles of pieces that could become staples and as it cost me so little it feels low-stakes. This actually looks like a really nice co-ord set with my DIY Leggings (if I’m feeling brave enough for no backside coverage 😂).
Time
Jesse is a PDF pattern and I have to say, I hate the cutting and sticking that it involved 🤦🏻♀ B️ut, for a free pattern that I got for signing up for the True Bias newsletter, it was completely worth the effort. Sewing up the actual t-shirt was really quick and a breeze too so this offset the printing, cutting and sticking time!
I also decided to overlock the neckband in without sewing it on the machine first and it turned out I wasn’t ready for this 😬 I had to unpick and try again, so that added some time but the finished result was worth it.
Pattern
This is a lovely pattern, the instructions were great and it was so straightforward to sew up. Now I have the pattern ready, I could whip up another one in no time and I definitely will. I can see why True Bias give this one away for free to showcase how their patterns work, I will definitely try more of their patterns in future. The length variations also make it really versatile. Their cropped version was too cropped for my taste but I just adjusted it to be the same length as my H&M top and I was happy 😊
Changes for Next Time?
The pattern was so straightforward that I don’t think I’d change anything before making more. I’m really pleased with this t-shirt and can see me getting a lot of wear out of it with jeans and under hoodies 😀 T️his could be a future favourite and I’d like to invest in some really good quality fabric and make another one very soon 🎉
-
DIY Cotton Leggings: A Step-by-Step Guide
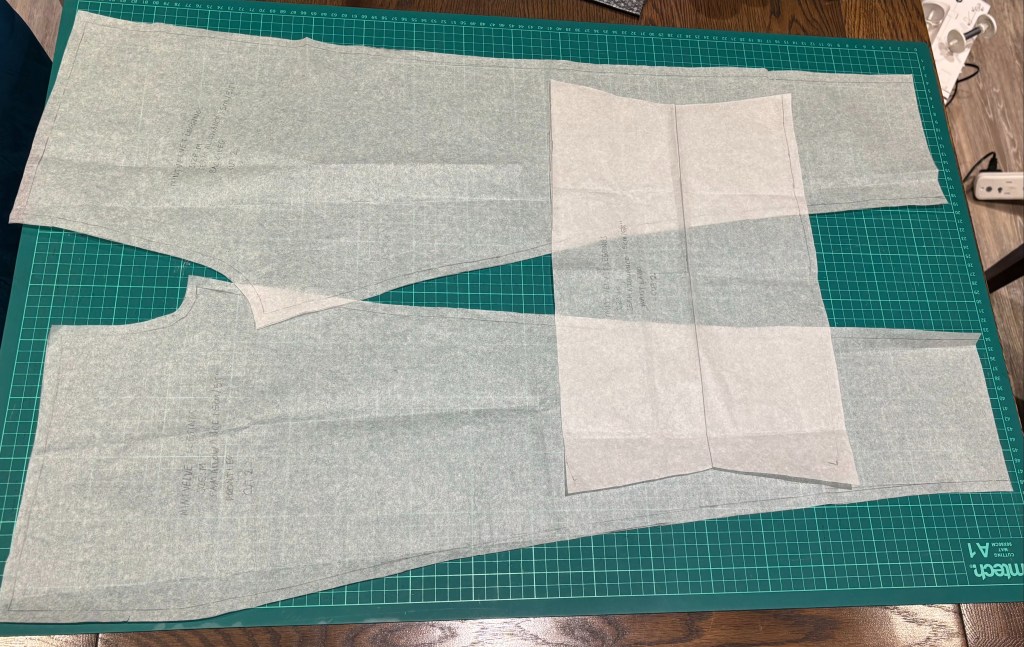
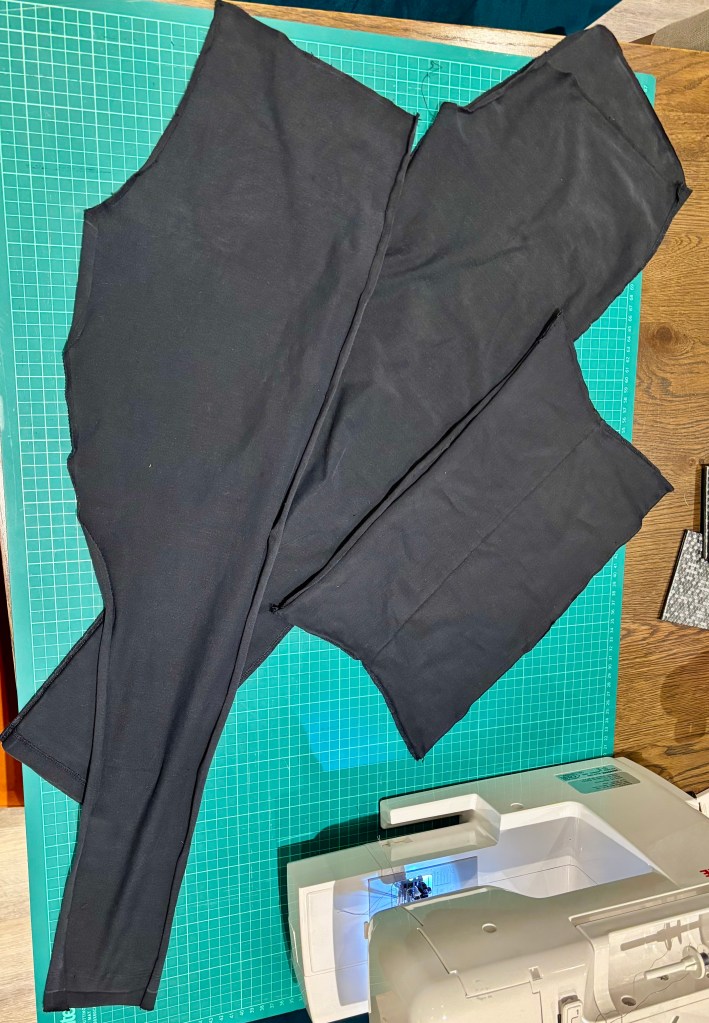
I have bought and returned more pairs of cotton leggings than I can count. I just can’t find any that are right for me but hadn’t thought to make my own until now! I had a pair of Mint Velvet leggings that had faded and had a small hole in them, so I decided to unpick them and use the pieces to make a pattern to try to make my own 😬.
The Mint Velvet pair were made from a high percentage of cotton, which is what I wanted for breathability, but they did grow baggy after they were worn and I was forever hoisting them up.Unpicking
I unpicked all the overlocking stitches to release the waistband and separate the front and back pieces of one leg.
Pattern Pieces
This then gave me pieces that I drew around using a pencil and pattern paper to create my pattern.
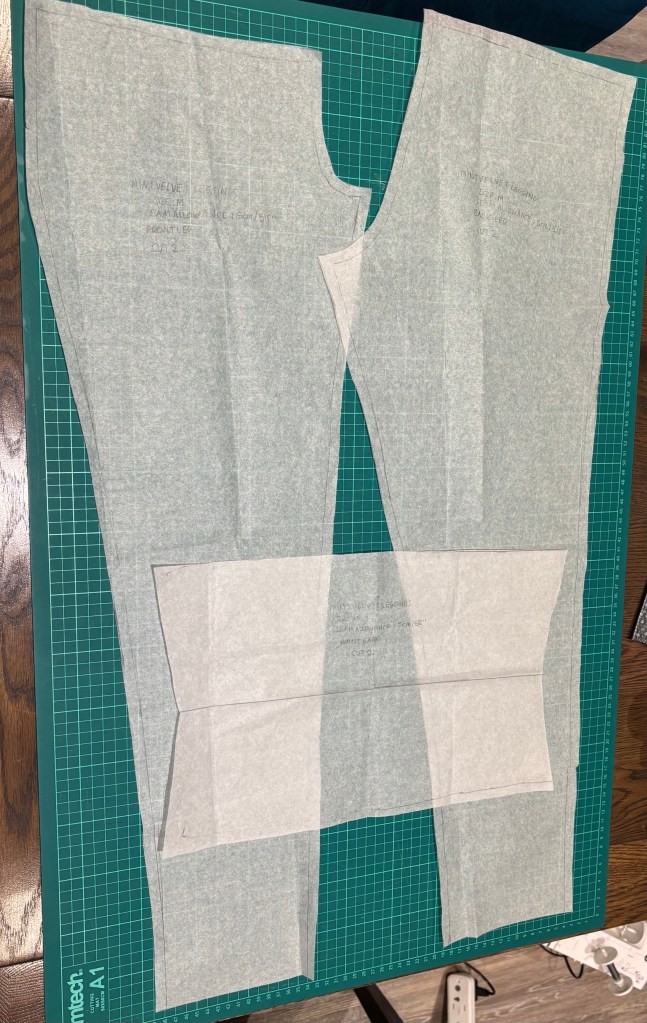
I added a 1.5 cm / 5/8″ seam allowance around the outside of each pattern piece and wrote on each one which part of the garment the piece was, the seam allowance and how many to cut for future reference.
Fabric
I used a dark grey cotton jersey fabric with a decent amount of stretch, that I bought a lot of from Dunelm in the sale a couple of years ago. It was good quality and very cheap and I’ve used it to make wearable toiles for many knit fabric items I’ve made but been unsure of fit or style. As I’ve got used to understanding how to sew with knits it’s been so handy to have some “low stakes” fabric and I’ve actually ended up with a few decent items almost by mistake!
Construction
The grey fabric felt like it had more stretch and better recovery than the Mint Velvet fabric, so I started out with a large zig zag stitch in a contrast colour for easy removal and decided to go with a 1cm / 3/8″ seam allowance initially. This ended up being too narrow so I ended up with the 1.5cm / 5/8″ allowance anyway! I think my dislike for unpicking, (especially after unpicking all of that overlocking) gave me fear of getting it wrong 😂
I used my Tilly and the Buttons Jaimie Pyjamas instructions for reference to construct the leggings. My steps were:
- Laid the front legs over the back, right sides together and sewed down each side.
- Turned one leg right side out and left one wrong side out, put the wrong side leg inside the right side leg and sewed the front and back crotch seams together.
- Tried the leggings on for fit on the legs and overlocked the seams so far.
- Made the waistband by overlocking the two pieces along the short edges, right sides together, then folded down the middle length wise to make one waistband piece. Attached this to the top of the leg pieces using the overlocker, marking and matching quarters around the top of each piece.
- Hemmed the legs using my twin needle to try to make them look professional ❤️

Time
The unpicking of the Mint Velvet leggings took so long and my neck was aching after looking down for so long! I had to keep telling myself this could be very worth it if it went well, it was a horrible job 😵 Making the pattern pieces was pretty quick in comparison and I did both of these jobs on a weekend afternoon.
Constructing the leggings was really quick, made longer by the initial trial and error with the seam allowance, but I think that was a good plan first time around. The hemming took a while because I hadn’t successfully used my twin needle before so had to do some reading up on tension and have a bit of practice on scraps first! Overall construction took another half a day in all.
Verdict
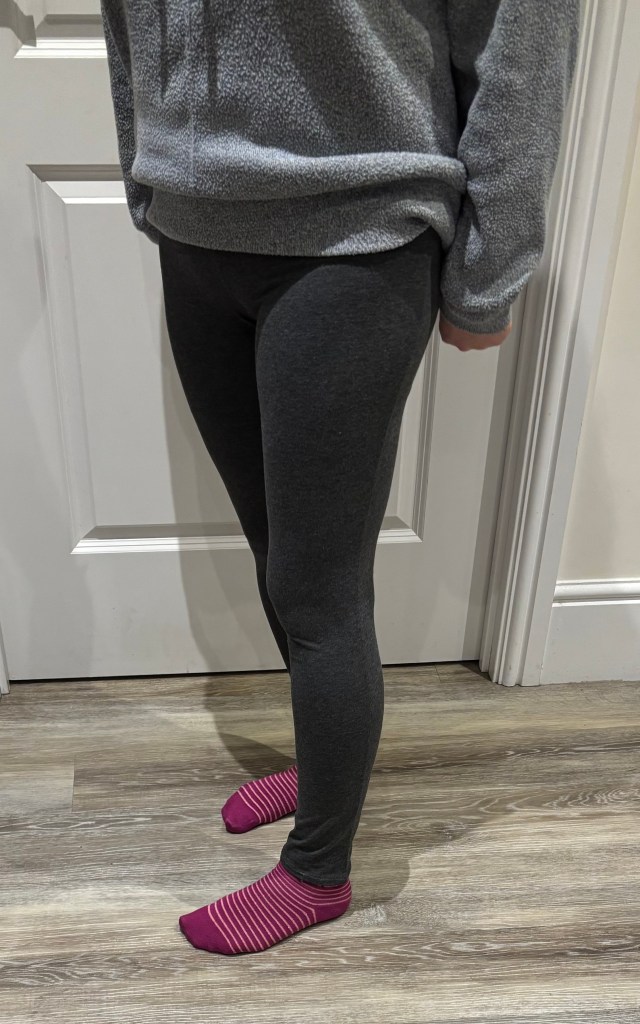
I’m really happy with these leggings ☺️ The front and back leg lengths were very different and I had to even them up, so I’ll need to adjust my pattern for next time.
I’ll definitely make more of these, I find them a staple, especially in Winter, and it’s been a great learning curve for cloning clothes and given me the confidence to try it with some more worn out favourites. I’m very happy with the fit so I’m going to invest in some “nicer” fabric and make black and navy pairs next 😁 🎉
-
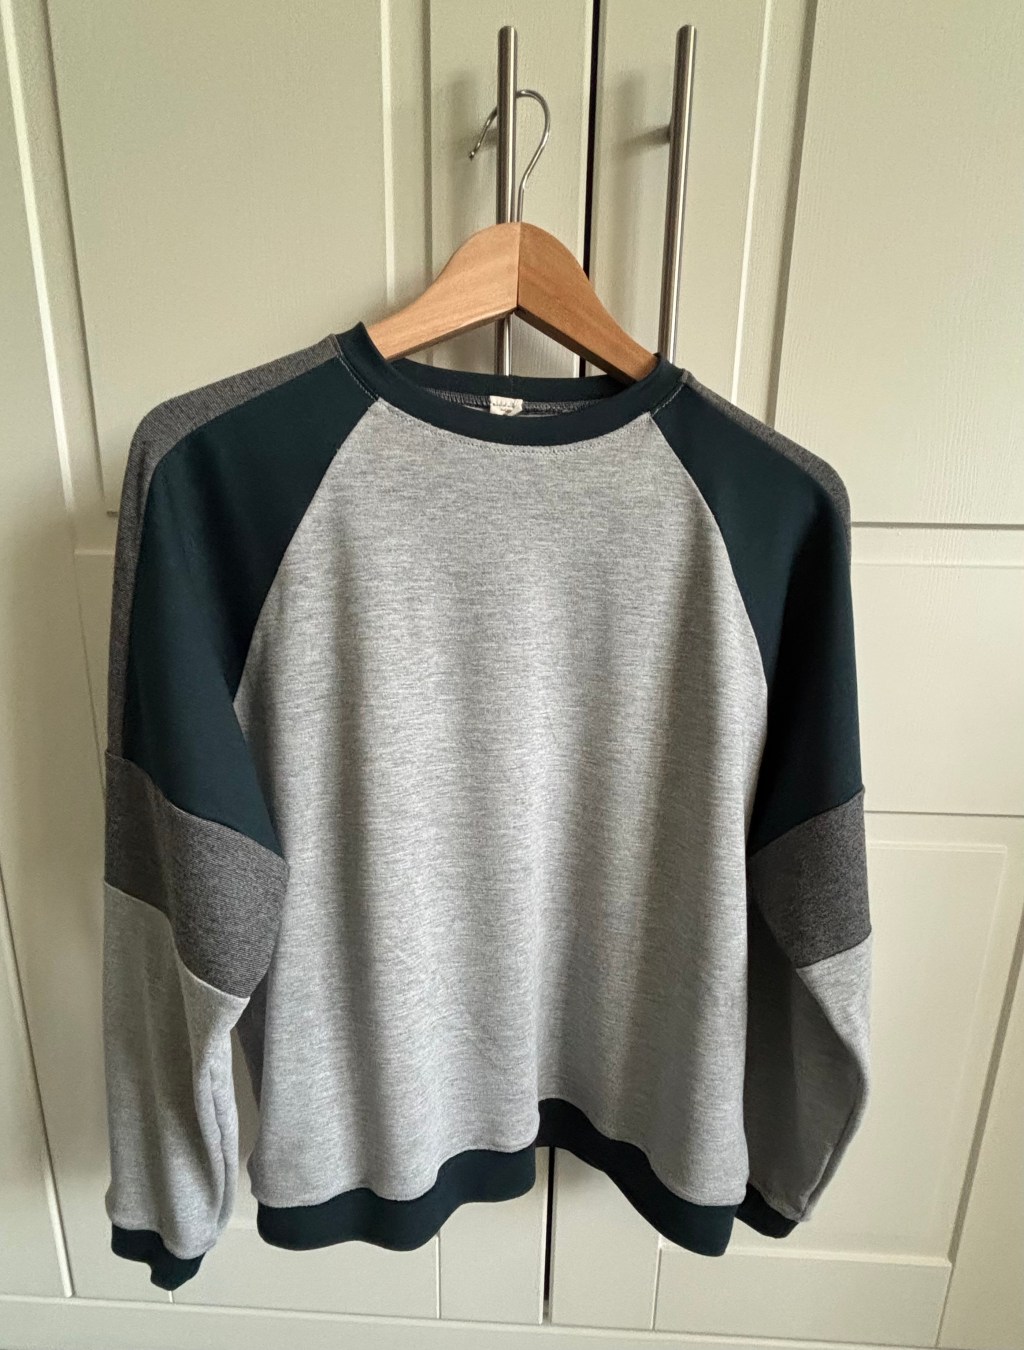
Drew Sweatshirt by Tilly and the Buttons
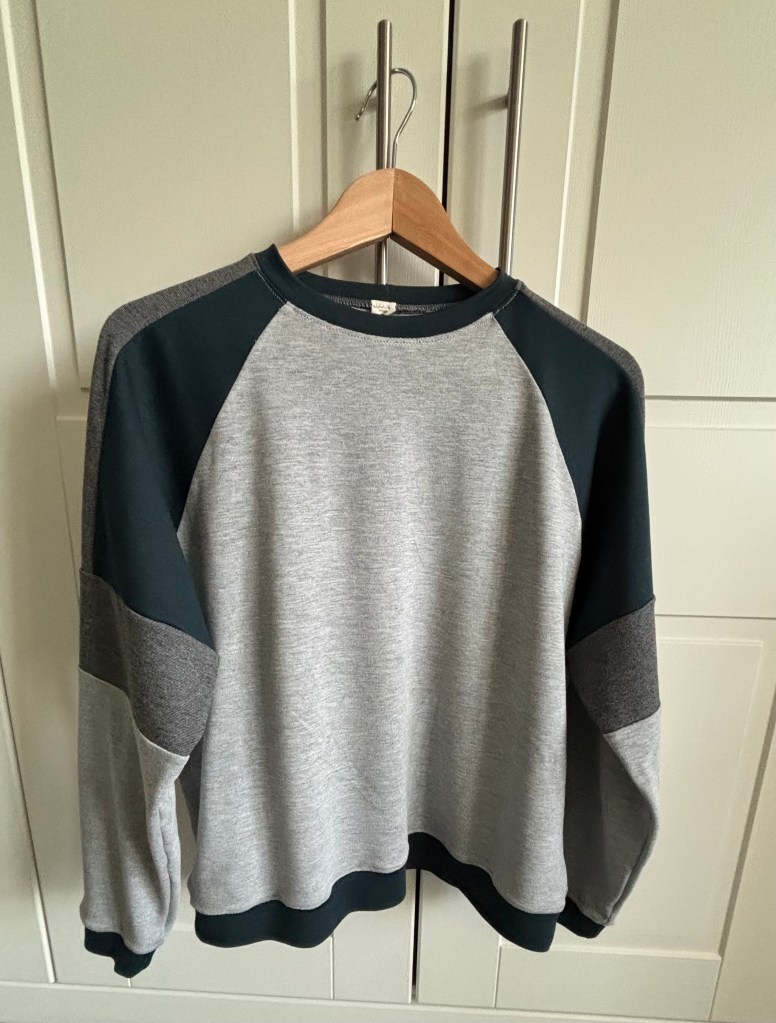
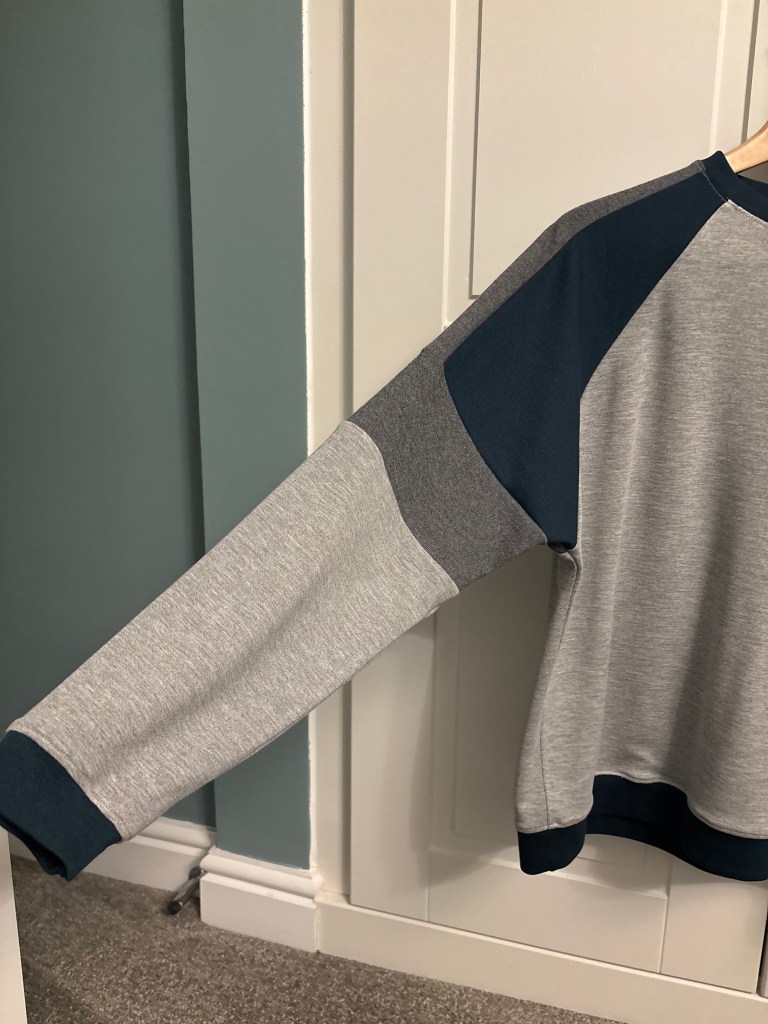
As soon as I saw the new Drew sweatshirt pattern from Tilly and the Buttons (TATB) I knew it could be a staple for me. I really like the Billie sweatshirt pattern, having made a few sweatshirts and a couple of dresses, and I loved the look of the raglan sleeves and oversized fit of Drew as well as the potential to use up some fabric scraps from my stash with the colour blocking ☺️
Fabric
I used ponte roma, and bought a silvery-grey to compliment the darker grey and teal from previous makes that had already worn and washed well. I’m so happy with how this turned out, the raglan sleeves make a very slight “bat wing” shape and that fits me well, because I don’t have too much of a waist.
Time
Drew only took me about 3 hours to make up (because I did the pattern and fabric cutting out on a different day) and it was a brilliant project to do mostly on the overlocker. I put the neckband, cuffs and waistband in on the sewing machine first because I obviously don’t trust myself enough yet 🤭
Pattern
I bought the printed pattern and think it’s really good value. I love that there are separate pieces for the non-colour blocked version and that there’s the option to make a cropped or hip-length version. I can see myself making a cropped version for my daughter very soon 😀 The instructions as always from TATB are brilliant and this was a really simple make. I’m still learning so much each time I make a garment, so it’s lovely to do a really straightforward sew like this which is an almost guaranteed win 🎉
Changes for Next Time
I’m actually really happy with how this piece turned out 😀 The only thing I’d change is the needle on my sewing machine which made some unwelcome pulls on the cuffs, neckline and waist where I attached the teal pieces, but you have to look hard to notice this. I’m happy with the fit, which is usually the biggest point of negative feedback for myself, so this feels like a win! I’m considering the Cece pattern now too because I bought quite a lot of the light grey fabric and this could be a really nice loungewear set that I could also get away with wearing “out” with a jacket over ❤️
-
Cosy Hot Water Bottle Cover

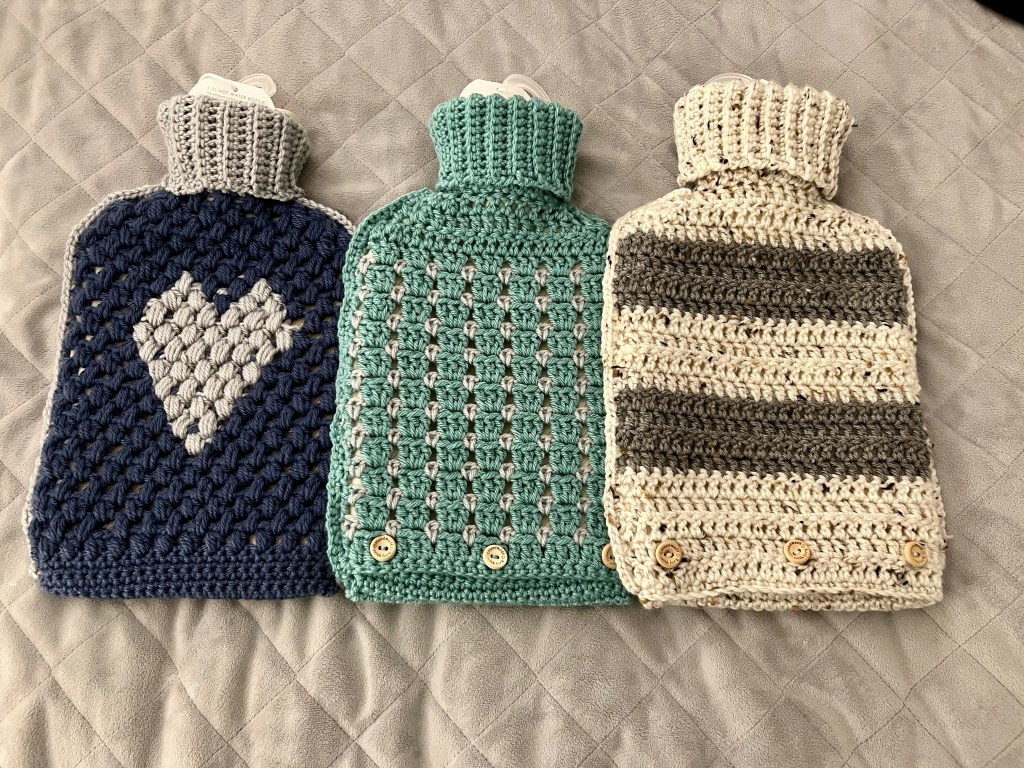
As Winter arrived, I decided to try to make a hot water bottle cover. This was the first time I’d felt confident to make something a little more advanced myself without a pattern. It came out pretty well so I decided to make more covers as gifts and I decided to write it up as my first pattern. It was lovely to give hand made gifts and I’ll definitely make more in future!
-
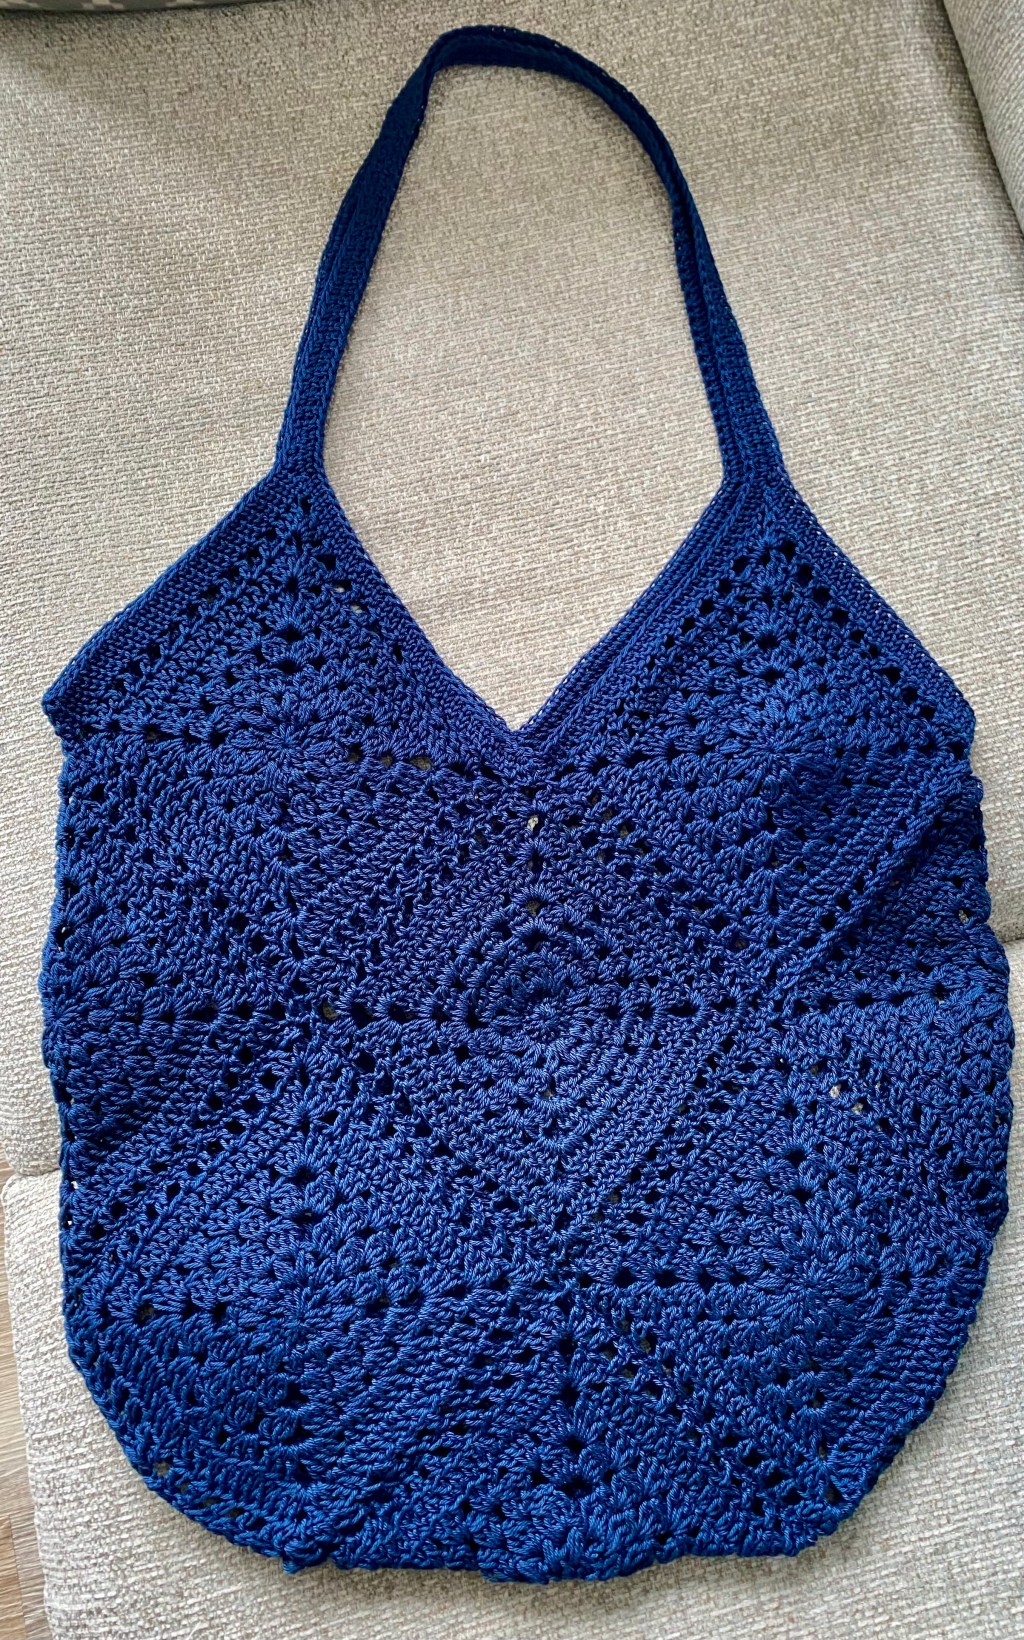
Wildrose Market Bag
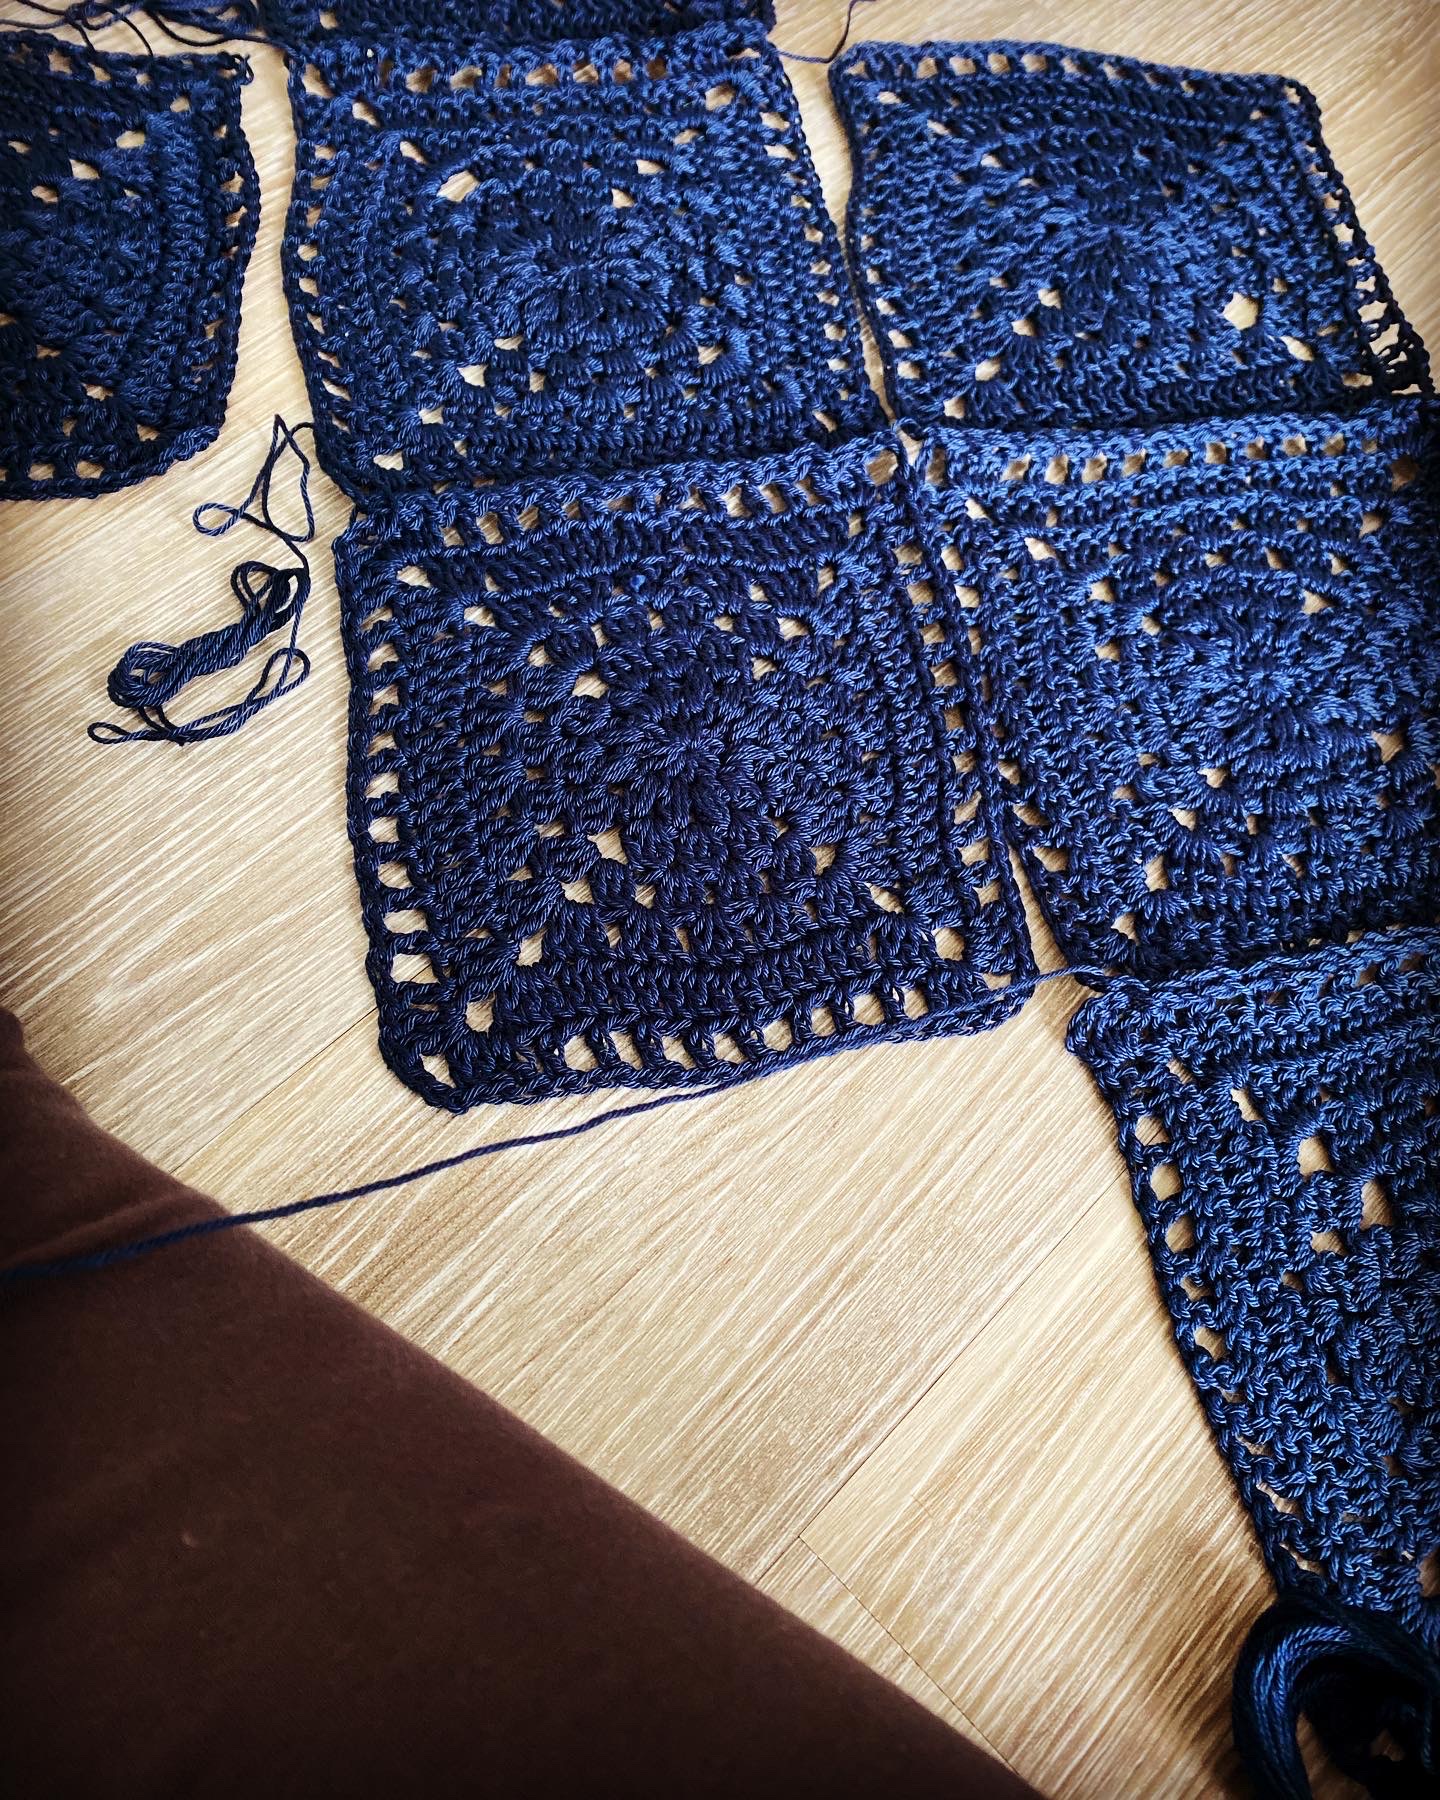

This lovely pattern is by All About Ami and you can follow the instructions on the website, YouTube or purchase a PDF pattern.
This was a good pattern to pick up and put down because it’s made from granny squares and the time needed to make one granny square was about half an hour (for me!) so it was good for short bursts over time. It took me a few weeks alongside another WIP.
My least favourite part was stitching the granny squares together but it was worth taking the time to do it properly!
My favourite part was learning the Waistcoat stitch to make the top of the bag and the strap more robust, I love the knitted look of this stitch.
Materials
I used:
- Patons cotton yarn from Hobbycraft in Navy
- Bent tip tapestry needle to stitch the squares together and weave in the ends
- Size 4 crochet hook
- 3 skeins of mercerised cotton yarn
Changes for next time
- The pattern recommended a size 3.75 hook, I used a size 4 but I would definitely size down to a 3 because the bag was just a bit too big in the end
- I will buy the PDF pattern
Kirsty Creates
Making my way to a homemade wardrobe 🧵🪡 🧶
Home
Hello,
I’m Kirsty 👋🏻

Welcome to my blog dedicated to all things crafty. I’m a sewist and crocheter, very much learning as I go, and if you’re here maybe you are too! My goal is to share my makes, successful and otherwise, as I work towards having a good quality, mostly homemade wardrobe of garments I’m proud of 🧵🪡 🧶